General
Introduction
The workflow enables the user to implement the hierarchical logic of the application in the form of a tree structure. This chapter will describe the necessary and optional Workflow-Elements used in the WorkflowSettings.xml file.
The definition of all workflows can be written in a XML-File, which should be stored at the following path:
..\Workflows\WorkflowSettings
As an example we create a "MyNewProject.xml" in this directory.
Hierachical structure of the Workflow-Elements:
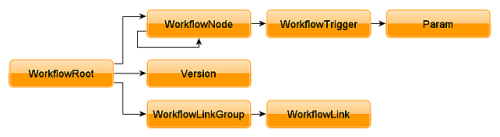
Relation between the distinct hierarchical layers:
WorkflowRoot
Root element for the Workflow-Settings structure, appears exactly once per document.
| Parent element | Child element | Cardinality |
|---|---|---|
| WorkflowRoot | WorkflowLinkGroup | 0 .. n |
| WorklfowNode | 1 .. n | |
| Version | 0 .. 1 |
 Markus Holler
WorkflowLinkGroup
Container element for embedding Workflow-Links in the panel navigation.
| Parent element | Child element | Cardinality |
|---|---|---|
| WorkflowRoot | WorkflowLink | 1 .. n |
Markus HollerWorkflowLink
Element for embedding Workflow-Nodes in the panel navigation.
Markus HollerVersion
Element for saving the Workflow specific software version.
Markus HollerWorkflowNode
Navigation element in the workflow
| Parent element | Child element | Cardinality |
|---|---|---|
| WorkflowNode | WorkflowNode | 0 .. n |
| WorkflowTrigger | 0 .. n |
Markus HollerWorkflowTrigger
Element to execute actions after the form was submitted (comparable to a database trigger).
| Parent element | Child element | Cardinality |
|---|---|---|
| WorkflowTrigger | Param | 0 .. n |
Markus HollerExample:
<?xml version="1.0" encoding="utf-8"?>
 <WorkflowRoot>
  <Version major="1" minor="0" hotfix="0" annex="1"/>
  <WorkflowLinkGroup name="Organizationgroup" label="Organizations">
    <WorkflowLink nodeid="110"/>
    <WorkflowLink nodeid="120"/>
  </WorkflowLinkGroup>
  <WorkflowNode id="0" label="Emergency operation center">
    <WorkflowNode id="200" label="Localization">
      <WorkflowNode id="210" label="Register Location" controller="Form" form="OPERATION"
         emptyform="true" condition="true" follownode="2240">
        <WorkflowTrigger name="Template" type="SqlTrigger" method="after"  condition="SQL[SELECT CASE COUNT(*) WHEN 0 THEN 1 ELSE 0 END FROM PR_OPERATION_UNIT WHERE OPERATION_ID={FORM.OPERATION_ID} AND {FORM.TEMPLATE_GUID} IS NULL]">
          <Param name="Sql" value="INSERT INTO PR_OPERATION_UNIT(OPERATION_ID,NAME,BEGINDATE)
         VALUES (NEW_GUID,'OPERATION VIENNA',SYSDATE)" />
        </WorkflowTrigger>
        ...
      </WorkflowNode>
    </WorkflowNode>
  </WorkflowNode>
  ...
 </WorkflowRoot>