Example: Building an interactive Squirrel Analysis App with forms and tables
Step-by-step: build a sidebar panel with a filter form, a synchronized table, live statistics and CSV export.
POSTED: | UPDATED: | by Stefan Schüttenkopf
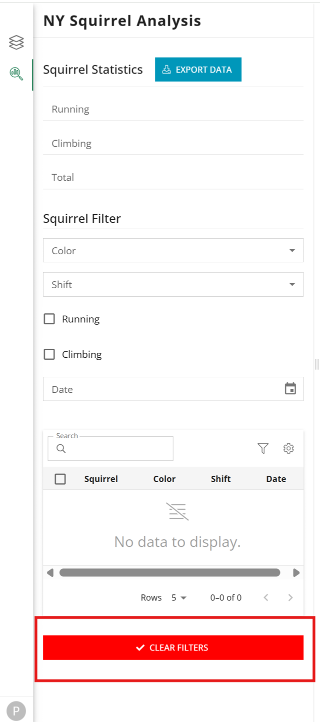
In this tutorial you will build an interactive analysis panel that allows users to explore the New York Squirrel Census dataset
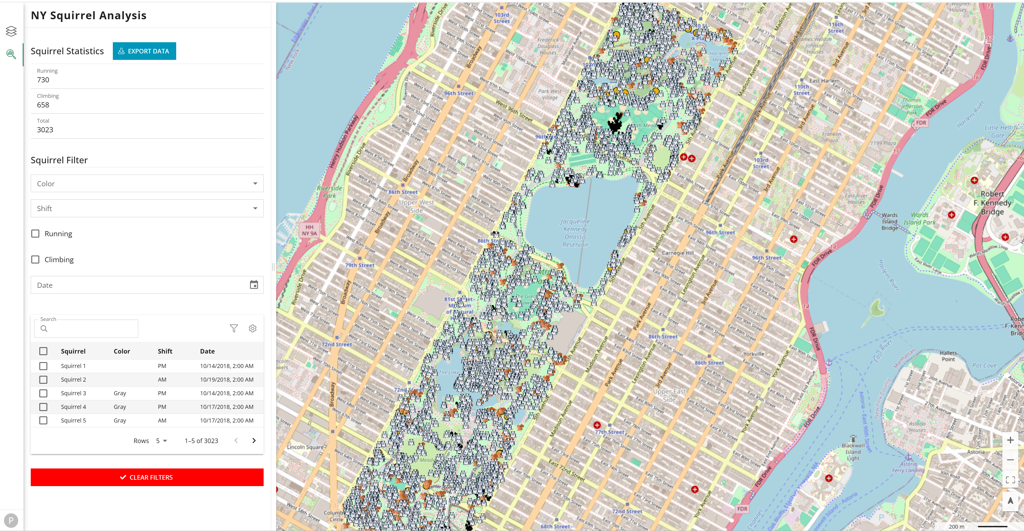
By the end of this tutorial you will be able to:
- Add a new sidebar item called NY Squirrel Analysis.
- Load squirrel data from a Studio query.
- Filter squirrels by color, shift, activity, and date.
- Keep the map, table, and statistics synchronized.
- Export the currently visible squirrels to CSV.
Before you start: Create the squirrel layer
Before building the application, create the squirrel layer (Data, Legend, Map View, Browser app)
Once the layer is available, you can start building the analysis application.
Step 1: Understand the application structure
Before writing code, it is useful to understand what we are building.
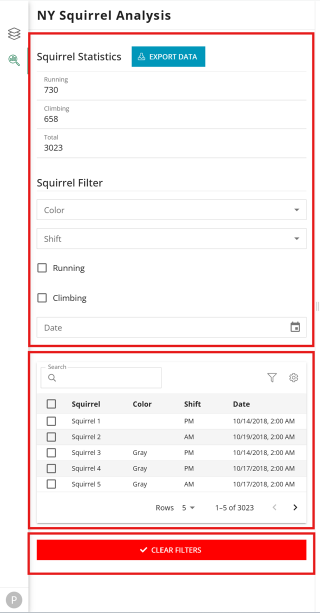
The sidebar panel consists of three independent components:
NY Squirrel Analysis
│
├── Statistics & Filters
├── Table
└── Clear Filters button
Each component has its own configuration, but they work together as a single application.
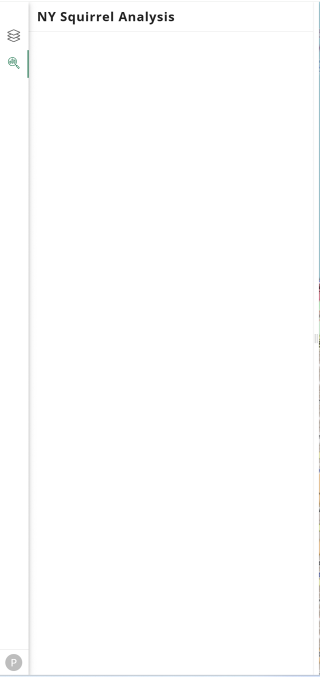
Step 2: Add the sidebar
async function main(): Promise<void> {
    const panelRoot = document.createDocumentFragment();

    window.map.stores.sidebarMenu.addMenuItem(
        {
            id: 'squirrel-form',
            icon: {
                svgIcon: {
                    path: 'M22.764 20.476l-4.24-4.24a.81.81 0 0 0-1.144 0l-.218.219-1.456-1.456a8.32 8.32 0 1 0-.708.707l1.457 1.456-.219.218a.81.81 0 0 0 0 1.145l4.24 4.238a.808.808 0 0 0 1.143 0l1.145-1.143a.811.811 0 0 0 0-1.144zM2.2 9.5a7.3 7.3 0 1 1 7.3 7.3 7.308 7.308 0 0 1-7.3-7.3zm18.848 12.421l-3.97-3.968.874-.873 3.97 3.968zM15 12.25v-5.5a.751.751 0 0 0-.75-.75h-1.5a.751.751 0 0 0-.75.75v5.5a.751.751 0 0 0 .75.75h1.5a.751.751 0 0 0 .75-.75zM14 12h-1V7h1zm-3.75-8h-1.5a.751.751 0 0 0-.75.75v7.5a.751.751 0 0 0 .75.75h1.5a.751.751 0 0 0 .75-.75v-7.5a.751.751 0 0 0-.75-.75zM10 12H9V5h1zM6.25 8h-1.5a.751.751 0 0 0-.75.75v3.5a.751.751 0 0 0 .75.75h1.5a.751.751 0 0 0 .75-.75v-3.5A.751.751 0 0 0 6.25 8zM6 12H5V9h1z',
                    viewWidth: 24,
                    viewHeight: 24
                },
                tooltip: 'Squirrels'
            },
            panel: {
                domContent: panelRoot,
                title: 'NY Squirrel Analysis'
            }
        },
        true
    );
}

main()
Step 3: Create the form
The form is the main interaction point for the user and it has two responsibilities:
- Display live squirrel statistics
- Allow users to filter the dataset.
Lets make the form visible by:
Defining the types
Outside the main function add the forms types
type SquirrelColor = 'gray' | 'black' | 'cinnamon';
type SquirrelShift = 'AM' | 'PM';

type Squirrel = {
  id: number;
  x: number;
  y: number;
  running: boolean;
  climbing: boolean;
  date: Date;
  primary_fur_color: SquirrelColor;
  shift: SquirrelShift;
};

type SquirrelFormValues = {
  color: SquirrelColor | null;
  shift: SquirrelShift | null;
  running: boolean | null;
  climbing: boolean | null;
  selected: any;
  selectedColor: string | null;
  date: Date | null;
  'running-label': number;
  'climbing-label': number;
  total: number;
};

let form: AppEngineDataSuppliedForm<SquirrelFormValues>;
These describe:
- what information a squirrel contains,
- what values the form stores
Think of these definitions as a blueprint shared by the entire application.
Using explicit types makes the code easier to understand and helps prevent mistakes while building the application.
The variable form provides programmatic access to form methods and values, including the current filter values.
Creating the DOM Container and the UI component
Inside the main function
const formRoot = document.createElement('div');
panelRoot.appendChild(formRoot);

//formConfig

form = FormInstance.create(formRoot, formConfig) as AppEngineDataSuppliedForm<SquirrelFormValues>;
Creating the formConfig
The configuration is stored inside formConfig inside the main function right before the UI component creation (form = FormInstance.create(formRoot, formConfig) as AppEngineDataSuppliedForm<SquirrelFormValues>;).
const formConfig = {
    ui: {
      displaySubmitButton: false,
      formBackgroundColor: 'transparent',
      sectionElevation: 0,
      sectionPadding: 1,
      formPadding: 1,
    },
    config: {
      sections: []
    }
  };
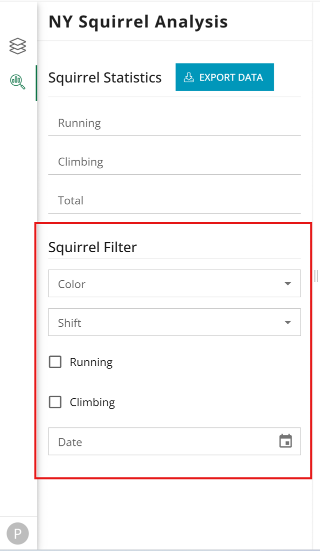
The form contains two sections:
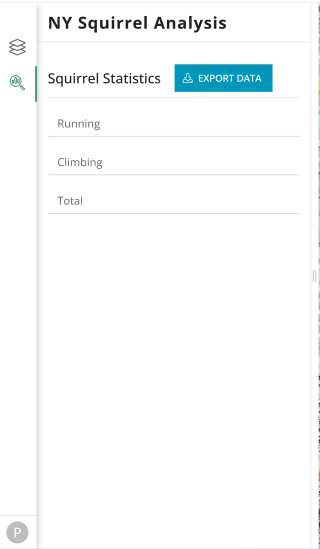
- Statistics section
The statistics section displays three live values: Running, Climbing and Total.
These values will be automatically recalculated every time the visible squirrels change.
Placing the action inside headerField displays the button in the section header instead of inside the form itself.
{
  section: 'Squirrel Statistics',
  headerField: {
    name: 'export',
    type: 'action',
    icon: ['fal','download'],
    label: 'Export Data',
    sx: {
      display: 'flex',
      justifyContent: 'flex-end',
    },
      onClick: () => {}
  },
  fields: [
    {
      name: 'running-label',
      type: 'label',
      label: 'Running',
      grid: {xs: 12, sm: 12, md: 6, lg: 4}
    },
    {
      name: 'climbing-label',
      type: 'label',
      label: 'Climbing',
      grid: {xs: 12, sm: 12, md: 6, lg: 4}
    },
    {
      name: 'total',
      type: 'label',
      label: 'Total',
      grid: {xs: 12, sm: 12, md: 12, lg: 4}
    }
  ]
}
- Filter section
The second section allows users to filter the squirrel dataset by: Color, Shift, Running, Climbing and Date
{
  section: 'Squirrel Filter',
  fields: [
    {
      name: 'color',
      type: 'select',
      label: 'Color',
      onChange: () => {},
      grid: { xs: 12, sm: 12, md: 6, lg: 6 },
      validation: [{ nullable: true }],
      options: [
        { label: 'Color...', value: null },
        { label: 'Gray', value: 'Gray' },
        { label: 'Black', value: 'Black' },
        { label: 'Cinnamon', value: 'Cinnamon' }
      ]
    },
    {
      name: 'shift',
      type: 'select',
      label: 'Shift',
      onChange: () => {},
      grid: { xs: 12, sm: 12, md: 6, lg: 6 },
      validation: [{ nullable: true }],
      options: [
        { label: 'Shift...', value: null },
        { label: 'AM', value: 'AM' },
        { label: 'PM', value: 'PM' }
      ]
    },
    {
      name: 'running',
      type: 'checkbox',
      label: 'Running',
      onChange: () => {},
      grid: { xs: 12, sm: 6, md: 6, lg: 6 }
    },
    {
      name: 'climbing',
      type: 'checkbox',
      label: 'Climbing',
      onChange: () => {},
      grid: { xs: 12, sm: 6, md: 6, lg: 6 }
    },
    {
      name: 'date',
      type: 'only-date-picker',
      label: 'Date',
      minDate: '2018-01-01',
      maxDate: '2018-12-31',
      onChange: () => {}
    }
  ]
}
| UI Configuration | Optional filter values | Responsive layout |
|---|---|---|
You can find more information in the UI documentation. | Together, these settings allow the user to select a value or leave the select filter inactive. Without them, the select field would require a value. | Every field includes a grid configuration. This allows the form to automatically adapt to different screen sizes. |
Step 4: Create the table
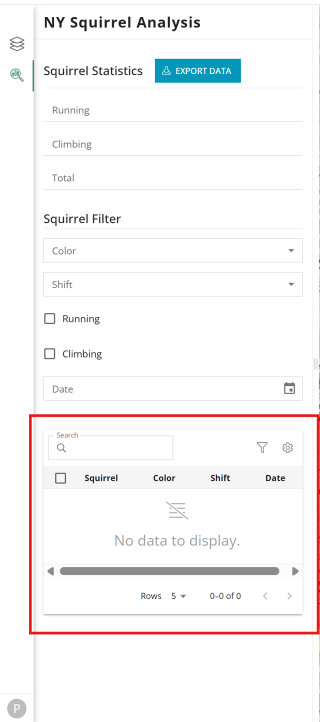
The table provides another way to explore the squirrel dataset.
Unlike a query table, this table uses: type: "data". This means the application loads the squirrel data only once. The table simply displays the data already stored in memory.
Lets make the table visible by:
Defining the types
Outside the main function add the table types
type SquirrelTableValues = {
  id: number;
  label: string;
  primary_fur_color: SquirrelColor;
  shift: SquirrelShift;
  date: Date;
};

let table: AppEngineDataSuppliedTable<SquirrelTableValues, 'id'>
These describe:
- what data appears in the table.
The variable table provides programmatic access to table methods, allowing the application to read and update selections and clear table filters
Creating the DOM Container and the UI component
Inside the main function
const tableRoot = document.createElement('div');
panelRoot.appendChild(tableRoot);

//formConfig
//tableConfig

table = TableInstance.create(tableRoot, tableConfig) as AppEngineDataSuppliedTable<SquirrelTableValues, 'id'>;
Creating the tableConfig
The configuration is stored inside tableConfig inside the main function right before the UI components creation (form and table table = TableInstance.create(ta… and form = FormInstance.create(fo…)
const tableConfig: AppEngineTableConfig<SquirrelTableValues, 'id'> = {
   ui: {
     elevation: 2,
     padding: 2,
     backgroundColor: 'transparent'
   },
  id: 'squirrel-table',
  keyField: 'id',
  type: "data",
  data: {
    data: (() => {
      return [];
    })()},
  toolbar:{
    actionsLeft: [QuickSearchAction],
    actionsRight: [FilterAction, SettingsAction]
  },
  columns: [
    {
      field: 'label',
      headerName: 'Squirrel'
    },
    {
      field: 'primary_fur_color',
      headerName: 'Color',
      type: 'singleSelect',
      valueOptions: ['gray', 'black', 'cinnamon']
    },
    {
      field: 'shift',
      headerName: 'Shift',
      type: 'singleSelect',
      valueOptions: ['AM', 'PM']
    },
    {
      field: 'date',
      headerName: 'Date',
      type: 'dateTime'
    }
  ],
  onRowClick: () => {},
  onSelectionChange: () => {}
};
| UI Configuration | Toolbar | Single Select columns | |
|---|---|---|---|
ui: {You can find more information in the UI documentation. | toolbar: {These provide: Quick Search, Table Filters, Column Settings. Since the application is going to have a dedicated squirrel filter panel, the toolbar acts as a complementary tool rather than the main filtering mechanism. | type: "singleSelect"The Color and Shift columns are configured as type: "singleSelect". This tells the table that these fields contain predefined categories instead of free text. As a result, the built-in filters become much easier to use. |
| Clicking a row | Selecting multiple rows |
|---|---|
onRowClick(...)Clicking a row selects the corresponding squirrel on the map. 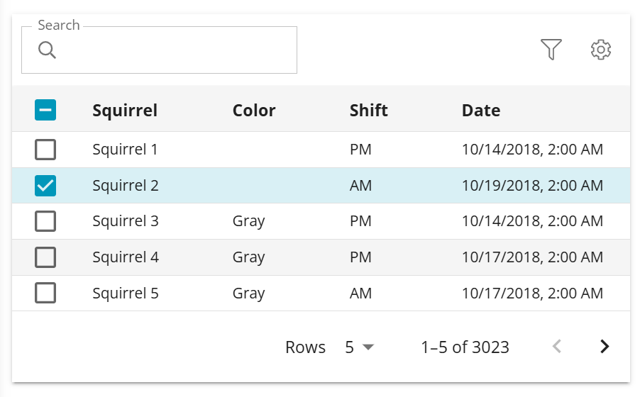 | onSelectionChange(...)Selecting multiple rows creates a subset of squirrels used for analysis. 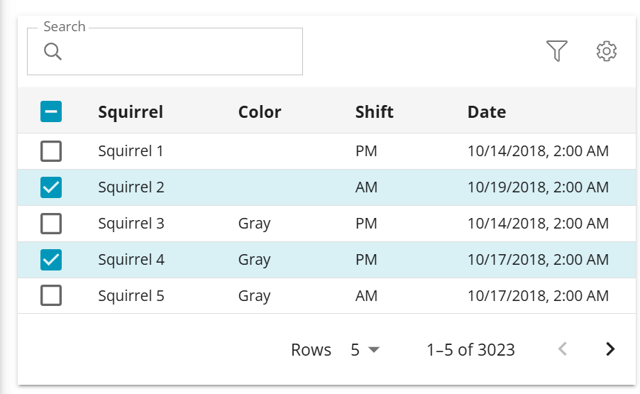 |
Step 5: Create the footer
The footer contains a single action. When clicked, it:
- resets the form
- clears the table selection
- removes table filters
- restores every squirrel on the map
Lets make the footer visible by:
Defining the types
type SquirrelFormFooterValues = {
  clear: () => void;
};
Creating the DOM Container and the UI component
Inside the main function
const formFooterRoot = document.createElement('div');
panelRoot.appendChild(formFooterRoot);

//formConfig
//tableConfig
//formFooterConfig

FormInstance.create(formFooterRoot, formFooterConfig) as AppEngineDataSuppliedForm<SquirrelFormFooterValues>;
Creating the formFooterConfig
The configuration is stored inside formFooterConfig inside the main function right before the UI components creation like the form and table
const formFooterConfig: AppEngineFormConfig<SquirrelFormFooterValues> = {
  ui: {
    displaySubmitButton: false,
    formBackgroundColor: 'transparent',
    formPadding: 2,
    sectionPadding: 0,
    sectionElevation: 0
  },
  config: {
    sections: [
      {
        fields: [
          {
            name: 'clear',
            type: 'action',
            icon: 'check',
            label: 'Clear Filters',
            sx: {
              '& .MuiButton-root': {
                width: '100%',
                bgcolor: 'red',
                color: 'white',
                '&:hover': {
                  bgcolor: 'darkred'
                },
              },
            },
            onClick: () => {
              form.reset();
              table.deSelectAll();
              table.setFilter(null);
            }
          }
        ]
      }
    ]
  }
};
Step 6: Create the query
The application loads all squirrel observations through a Studio query.
Go to Studio > Content > Queries and create a new query named squirrel_census with the following SQL:
SELECT
  id,
  primary_fur_color,
  running,
  climbing,
  x,
  y,
  shift,
  date,
  TO_DATE(LPAD(date::text, 8, '0'), 'MMDDYYYY') AS parsed_date,
  TO_CHAR(TO_DATE(LPAD(date::text, 8, '0'), 'MMDDYYYY'), 'YYYY-MM-DD') AS js_date
FROM squirrel_census
ORDER BY id;
This query returns all the information required by the application, including: squirrel identifier, coordinates, fur color, running and climbing flags, shift (AM/PM) and observation date.
Notice that the query also creates a js_date field. This converts the original database date into a format that JavaScript can easily transform into a Date object.
Step 7: Define the shared state
Let's add another type needed for the filter function
type SquirrelFilterValues = Partial<Pick<SquirrelFormValues, 'color' | 'shift' | 'running' | 'climbing' | 'date'>>;
Now, right after all the types definitions create the shared variables.
const { map } = window;
const LAYER_ID = 'squirrel_census';
const DEFAULT_FORM_VALUES: SquirrelFilterValues = {
  color: 'black',
  shift: null,
  running: false,
  climbing: false
};
const SQUIRREL_CSV_HEADERS: Array<keyof Squirrel> = [
  'id',
  'x',
  'y',
  'running',
  'climbing',
  'primary_fur_color',
  'shift'
];
let squirrels: Squirrel[] = [];
let visibleIds = new Set<number>();
const queryName = 'squirrel_census';
These variables are used by multiple parts of the application.
For example:
- squirrels stores the complete dataset.
- visibleIds keeps track of the squirrels currently visible on the map
Step 8: Create the helper functions
Instead of placing all the application logic inside main(), the tutorial uses several small helper functions. Each helper performs a single task.
This makes the application easier to understand and maintain.
Now, right after all the types and variables add the functions.
Loading Data
Executes the Studio query and converts every database row into a squirrel object. For more information about query execution read the following tutorial.
async function loadSquirrels(): Promise<Squirrel[]> {
  const result = await executeQuery(queryName, {
    format: 'json',
    srid: 4326,
    parameters: {}
  });
  return result.rows.map((row: any) => ({
    id: row.id,
    x: row.x,
    y: row.y,
    running: row.running,
    climbing: row.climbing,
    primary_fur_color: row.primary_fur_color,
    shift: row.shift,
    date: new Date(row.js_date)
  }));
}
Filtering
Whenever the user changes a filter, this function determines which squirrels satisfy the selected criteria.
function filterSquirrels(
  values: SquirrelFilterValues = {}
): Squirrel[] {
  return squirrels.filter(squirrel => {
    return (
      (values.color == null || squirrel.primary_fur_color === values.color) &&
      (values.shift == null || squirrel.shift === values.shift) &&
      (!values.running || squirrel.running) &&
      (!values.climbing || squirrel.climbing) &&
      (!values.date || sameDay(squirrel.date, values.date))
    );
  });
}
Updating the map
Rather than removing squirrels from the layer, the function updates the layer filter so that only the matching squirrels remain visible.
function getSquirrelsLayer(): FeatureLayer | null {
  return map.layerTree.children.find(
  (l) => l.label === LAYER_ID) as FeatureLayer | null;
}
function refreshSquirrelLayer(filtered: Squirrel[]): void {
  const squirrelsLayer = getSquirrelsLayer();
  if(!squirrelsLayer){
    return
  }
  visibleIds = new Set(filtered.map(s => s.id));
  squirrelsLayer.filter = (feature: Feature<Point, Squirrel>) => {
    return visibleIds.has(feature.properties.id);
  };
}
Updating statistics
Recalculates the Running, Climbing and Total counters.
function updateSquirrelStatistics(filtered: Squirrel[]): void {
  form.setValue('running-label', filtered.filter(s => s.running).length);
  form.setValue('climbing-label', filtered.filter(s => s.climbing).length);
  form.setValue('total', filtered.length);
}
Synchronizing the interface
function syncVisualState(filtered: Squirrel[]): void {
  refreshSquirrelLayer(filtered);
  updateSquirrelStatistics(filtered);
}
Instead of updating the map and statistics separately, this helper updates both together.
Keeping a single synchronization function helps ensure every part of the interface always displays the same data
Handling user interactions
Three functions respond to interactions with the form, table, and map. They use the form and table APIs to read filter values, reset fields, update table selections, and clear table filters. Each function then calls syncVisualState() so that the map and statistics reflect the same subset of squirrels.
function applyFormFilters(): void {
  const values = form.getValues();
  const filtered = filterSquirrels(values);
  table.deSelectAll();
  syncVisualState(filtered);
}
function applyTableSelection(selectedIds: Array<string | number>): void {
  form.reset(DEFAULT_FORM_VALUES);
  table.setFilter(null);
  const selectedIdSet = new Set(selectedIds.map(Number));
  const selectedSquirrels =
    selectedIdSet.size > 0
      ? squirrels.filter((s) => selectedIdSet.has(s.id))
      : squirrels;
  syncVisualState(selectedSquirrels);
}
function applyMapClickFilter(ids: string[]): void {
    if (!ids.length) {
      form.reset(DEFAULT_FORM_VALUES);
      table.deSelectAll();
      table.setFilter(null);
      syncVisualState(squirrels);
      return;
    }
    const selectedIds = ids.map(Number);
    const filtered = squirrels.filter((squirrel) => selectedIds.includes(squirrel.id));
    form.reset(DEFAULT_FORM_VALUES);
    table.setFilter(null);
    table.setSelection(...selectedIds);
    syncVisualState(filtered);
}
applyFormFilters() Reads the current values with form.getValues(), filters the in-memory squirrel dataset, clears any existing table selection, and synchronizes the map and statistics.
applyTableSelection() Resets the form filters with form.reset(), clears built-in table filters with table.setFilter(null), and displays only the squirrels selected in the table. When no rows are selected, the complete dataset is restored.
applyMapClickFilter() Responds to selections made on the map. It resets the form and table filters, updates the table selection with table.setSelection(), and synchronizes the interface with the squirrels selected on the map.
Comparing dates
The application needs a way to determine whether two dates represent the same calendar day. The helper function sameDay() performs this comparison.
function sameDay(a: Date, b: Date){
  const d1 = new Date(a);
  const d2 = new Date(b);
  return (
    d1.getFullYear() === d2.getFullYear() &&
    d1.getMonth() === d2.getMonth() &&
    d1.getDate() === d2.getDate()
  );
};
Rather than comparing two complete Date objects, which also include hours, minutes, and seconds, this function compares only the year, month, and day.
This is important because the application only needs to know whether a squirrel was observed on the selected date, regardless of the exact time.
For example:
2018-10-15 08:30
2018-10-15 17:45
Both observations occurred on October 15, 2018, so sameDay() considers them equal.
The filterSquirrels() function uses this helper whenever the user selects a date from the date picker.
Exporting Data
function exportToCSV(): void {
  const data: Squirrel[] = squirrels.filter(s => visibleIds.has(s.id));
  if (!data.length) {
    return;
    }
  const csv = [ SQUIRREL_CSV_HEADERS.join(','),
    ...data.map(row =>
      SQUIRREL_CSV_HEADERS.map(h =>
        JSON.stringify((row as any)[h] ?? '')
      ).join(',')
    )
  ].join('\n');
  const blob = new Blob([csv], {
    type: 'text/csv;charset=utf-8'
  });
  const url = URL.createObjectURL(blob);
  const a = document.createElement('a');
  a.href = url;
  a.download = 'squirrels.csv';
  a.style.display = 'none';
  document.body.appendChild(a);
  a.click();
  document.body.removeChild(a);
  URL.revokeObjectURL(url);
}
Exports only the squirrels that are currently visible.
The generated file is automatically downloaded as squirrels.csv.
Step 9: Import the required classes
At the beginning of your script, import the LuciadRIA classes used throughout the tutorial.
import { Point } from '@luciad/ria/shape/Point';
import { FeatureLayer } from '@luciad/ria/view/feature/FeatureLayer';
import { Feature } from '@luciad/ria/model/feature/Feature';
These imports are used to:
- work with map geometries
- access the squirrel layer
- filter visible map features
Step 10: Assemble the application
Lets make this app work by calling the functions that we already built.
Loading the data before creating the table ensures that every component has immediate access to the complete dataset. So lets call the loading function before the creation of the form-, table- and formFooterConfig
squirrels = await loadSquirrels();
visibleIds = new Set(squirrels.map(s => s.id));

//formConfig
//tableConfig
//formFooterConfig
//...
applyFormFilters | exportToCSV |
|---|---|
Go to formConfig > section: 'Squirrel Filter', and replace the onChange with
| Go to formConfig > section: 'Squirrel Statistics', and replace the onClick with
|
| Table Data | applyTableSelection() |
|---|---|
Go to tableConfig and replace data with | Go to tableConfig and replace onRowClick and onSelectionChange with |
syncVisualState() |
|---|
Go to formFooterConfig and add it in onClick |
Step 11: Connect the map
The last step is to initialize the synchronization between the map and the interface.
Right after the sidebar menu:
requestAnimationFrame(() => {
  updateSquirrelStatistics(squirrels);
});

map.stores.mapState.onManualFeatureSelect(applyMapClickFilter);
map.stores.mapState.onManualFeatureDeselect(applyMapClickFilter);
Initializes the statistics when the application starts and ensure that selecting squirrels on the map automatically updates the table and statistics.