This article explores the integration of Docker with M.App Enterprise, highlighting the benefits of containerization for efficient deployment, scalability, and management.
What is Docker?
platform for developing, shipping, and running applications. Docker utilizes containerization technology to package software into standardized units called containers. These containers encapsulate all the necessary components, including the code, runtime, libraries, and system tools, ensuring that applications run consistently across different computing environments.
Advantages of Containers
Containers offer several advantages over traditional virtual machines. They are lightweight, as they share the host operating system's kernel, which results in faster startup times and lower resource consumption. This efficiency makes containers ideal for deploying and scaling applications in various environments, from local development machines to large-scale cloud infrastructure.Scalability: Containers can be easily scaled up or down to meet varying demand, ensuring optimal performance and resource utilization.Portability: Containers can run consistently across different environments, from local development setups to cloud-based production systems, reducing the "it works on my machine" problem.Easy Management: Docker simplifies the management of application dependencies and configurations, making it easier to update and maintain M.App Enterprise services.Consistency: By providing a consistent runtime environment, Docker ensures that applications behave the same way in development, testing, and production, reducing bugs and deployment issues.
In the following sections, we will delve into how Docker can be integrated with M.App Enterprise to enhance its deployment and management.
Preliminaries
Install Docker
Make sure Docker is installed on your system. Find further instructions on the official Docker Website https://www.docker.com/products/docker-desktop/
Ensure Docker Compose is installed as well. It usually comes bundled with Docker Desktop.
Enable Windows Features
When setting up Docker on Windows, you need to enable certain Windows features to ensure that Docker can run effectively.
Open PowerShell as an Administrator and run the two following commands:
Enable-WindowsOptionalFeature -Online -FeatureName containers -All
Enable-WindowsOptionalFeature -Online -FeatureName Microsoft-Hyper-V-AllCreate a Warehouse Folder
This step involves creating a directory on your system to act as a "warehouse" or storage location for M.App Enterprise. You can create this folder anywhere on your file system where you have appropriate permissions. It's a good idea to choose a location that is easy to access and manage.
Create an Empty Database
This step requires you to set up a new database that will be used specifically for management purposes.
Local User Permissions
You will need a local user to run the Docker container, as a network user will not suffice. If you don't have a local user yet, please create one. If you already have one, ensure that the appropriate permissions are set. It is essential that the user has the Log on as a service right in the Local Security Policy.
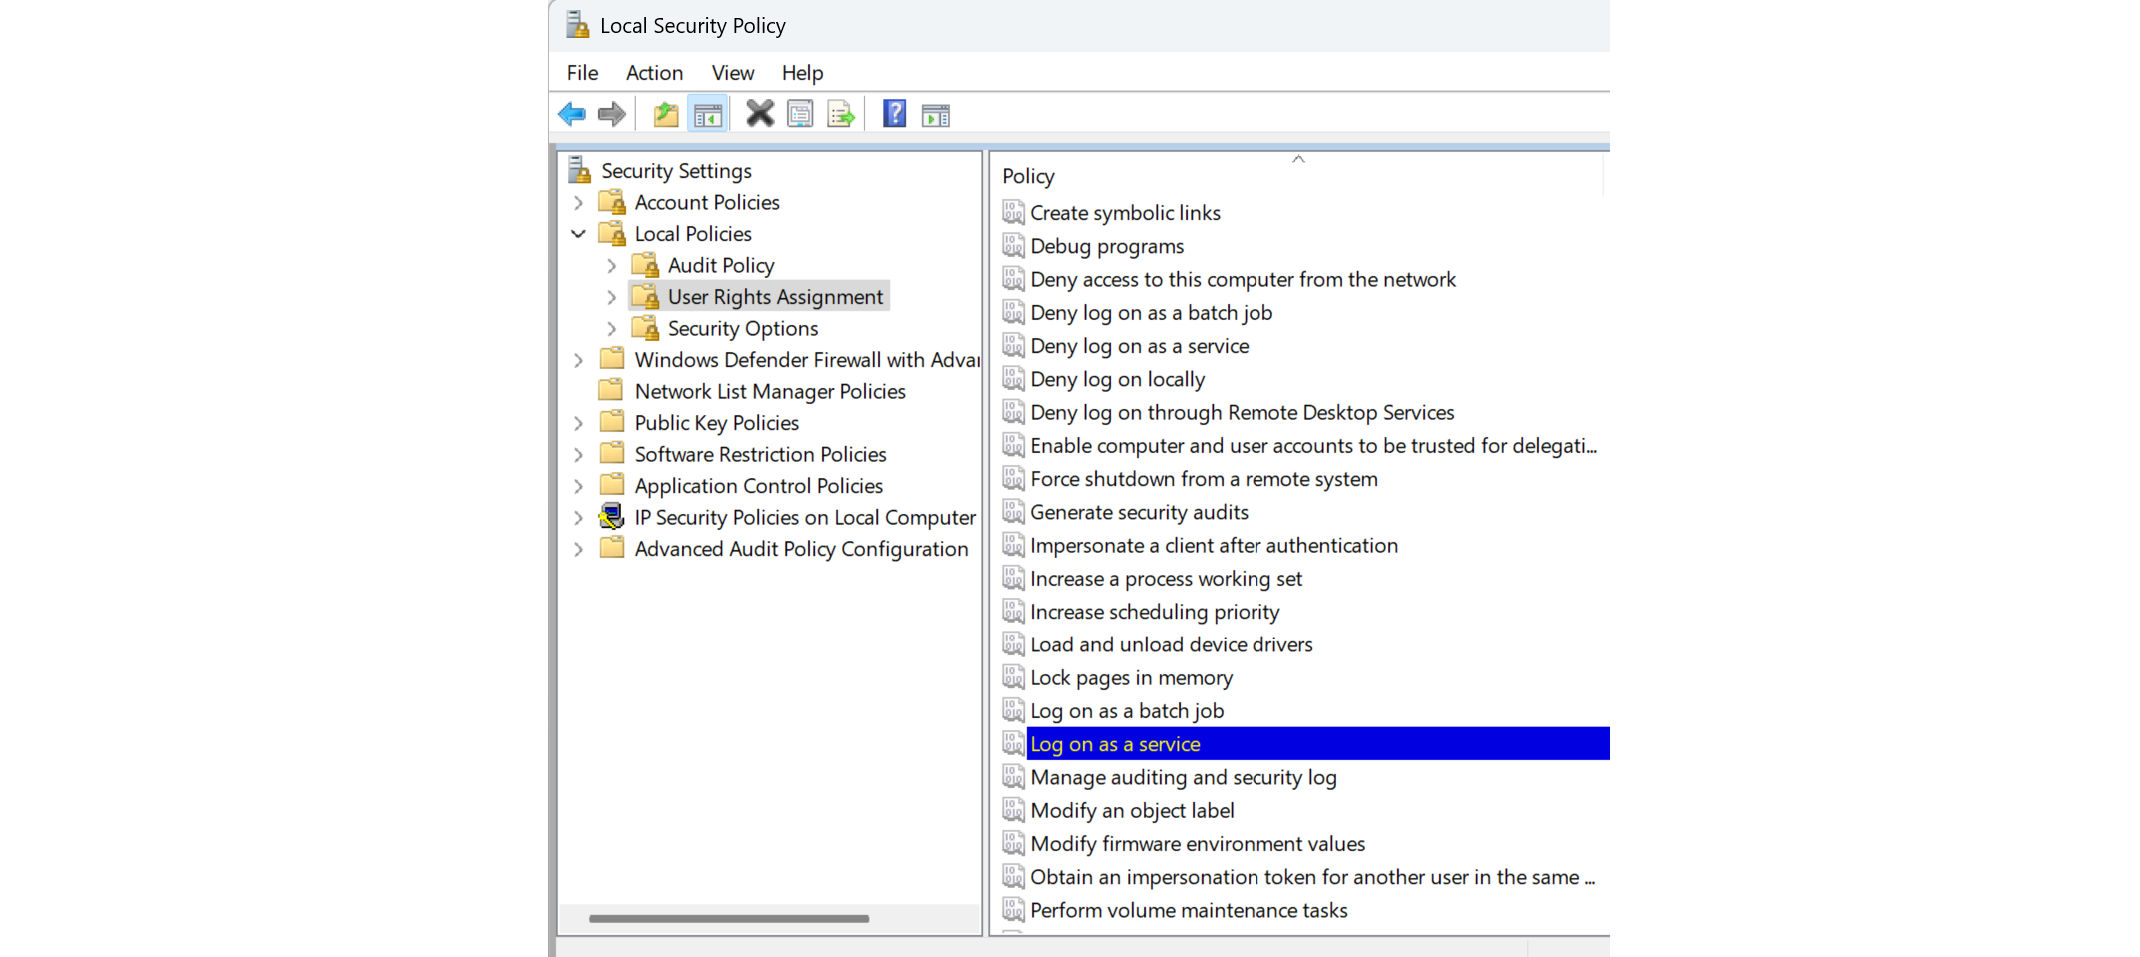
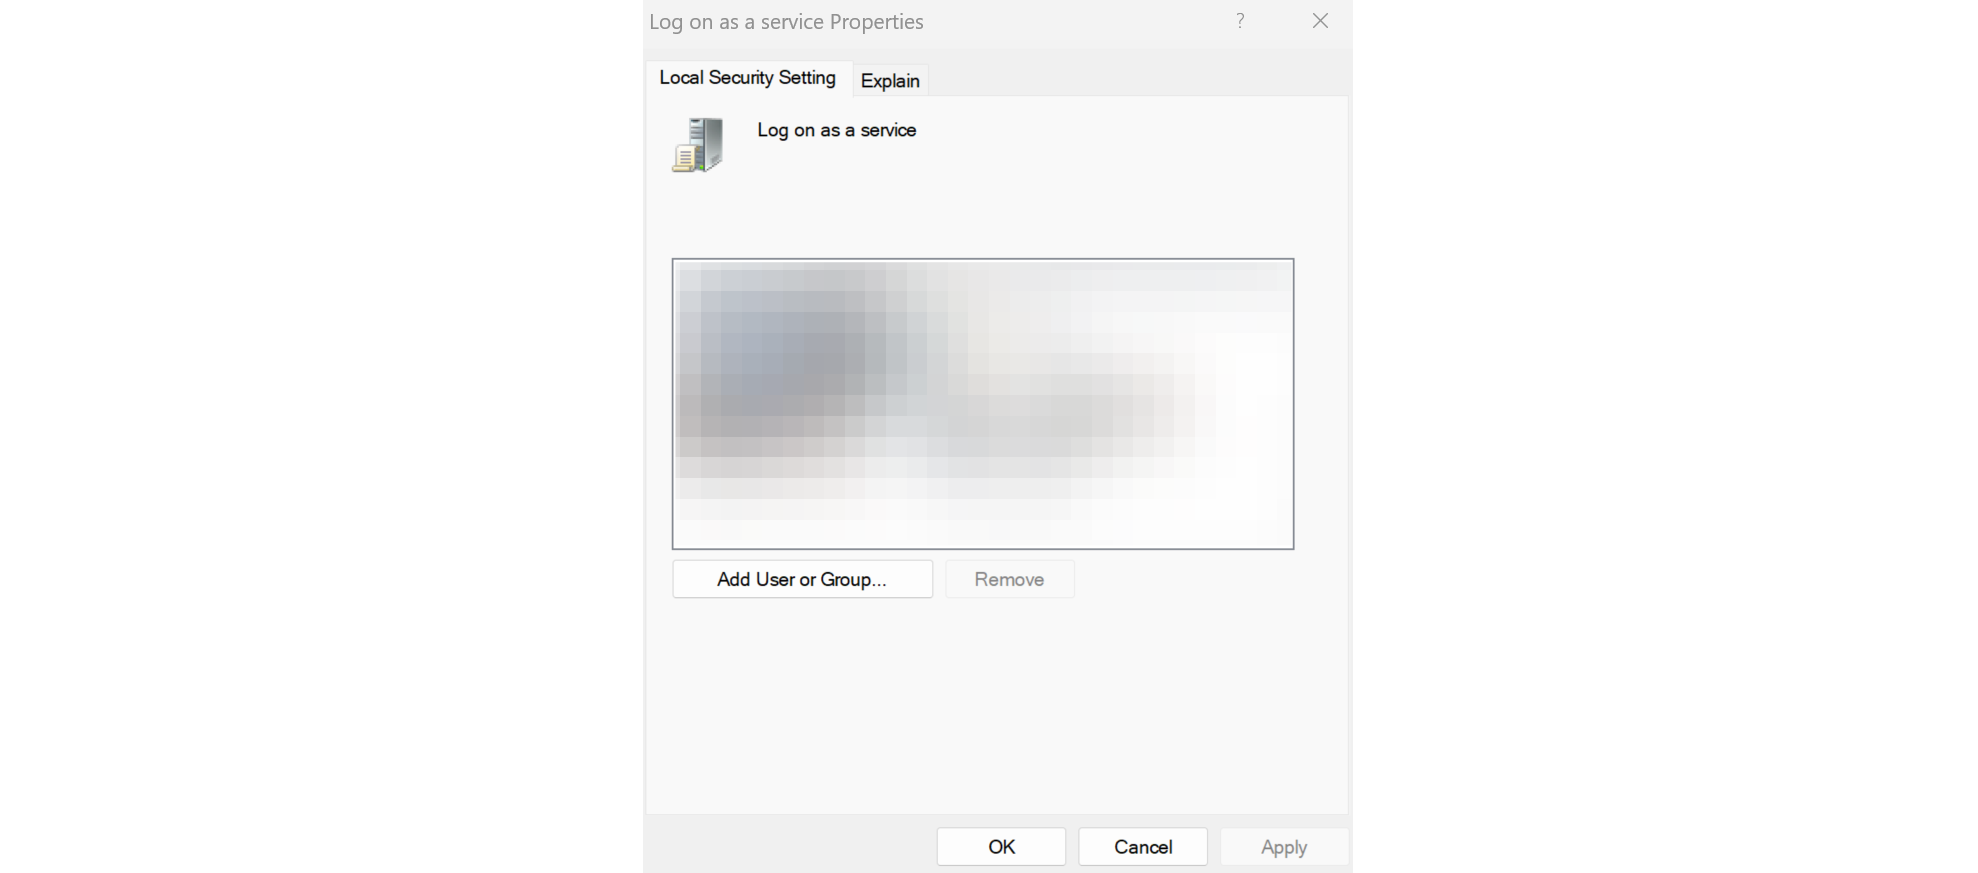
Double-click on the policy and add your user in the local security setting.
Download Docker Images
The images are provided as .tar files in the license portal.

Docker Desktop Settings
Open Docker Desktop to adjust your settings as reported in the following paragraphs.
Switch to Windows containers
Docker Desktop usually defaults to Linux containers, as they are widely used and offer broad compatibility. However, currently, M.App Enterprise operates exclusively on Windows containers.
Click on the settings icon in the menu bar, navigate to Builders and make sure that desktop-windows is running.
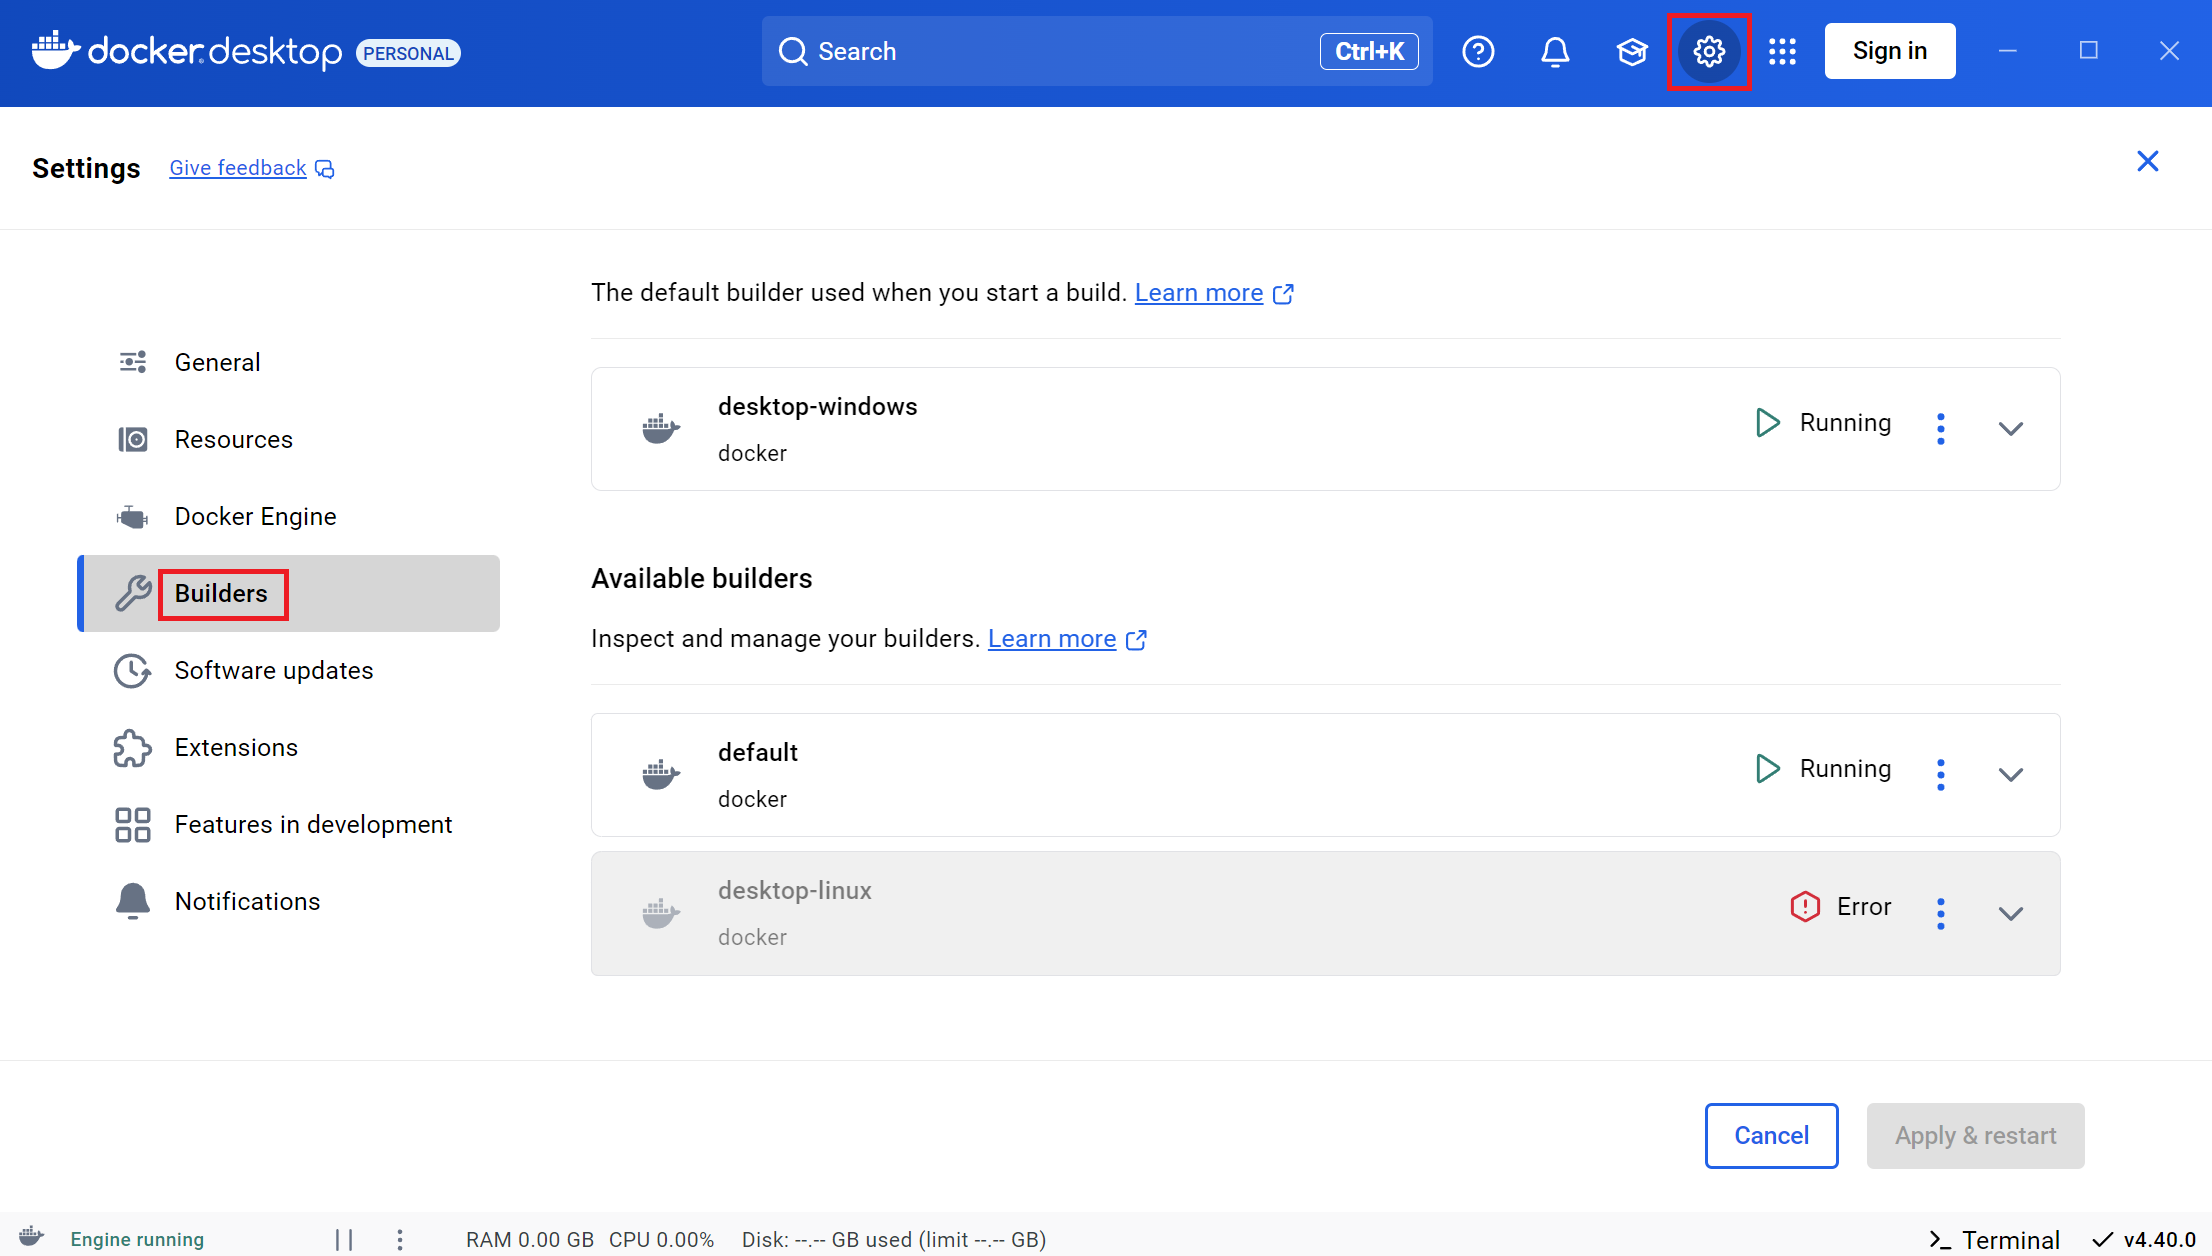
General section and ensure that the option Use the WSL 2 based engine is unchecked.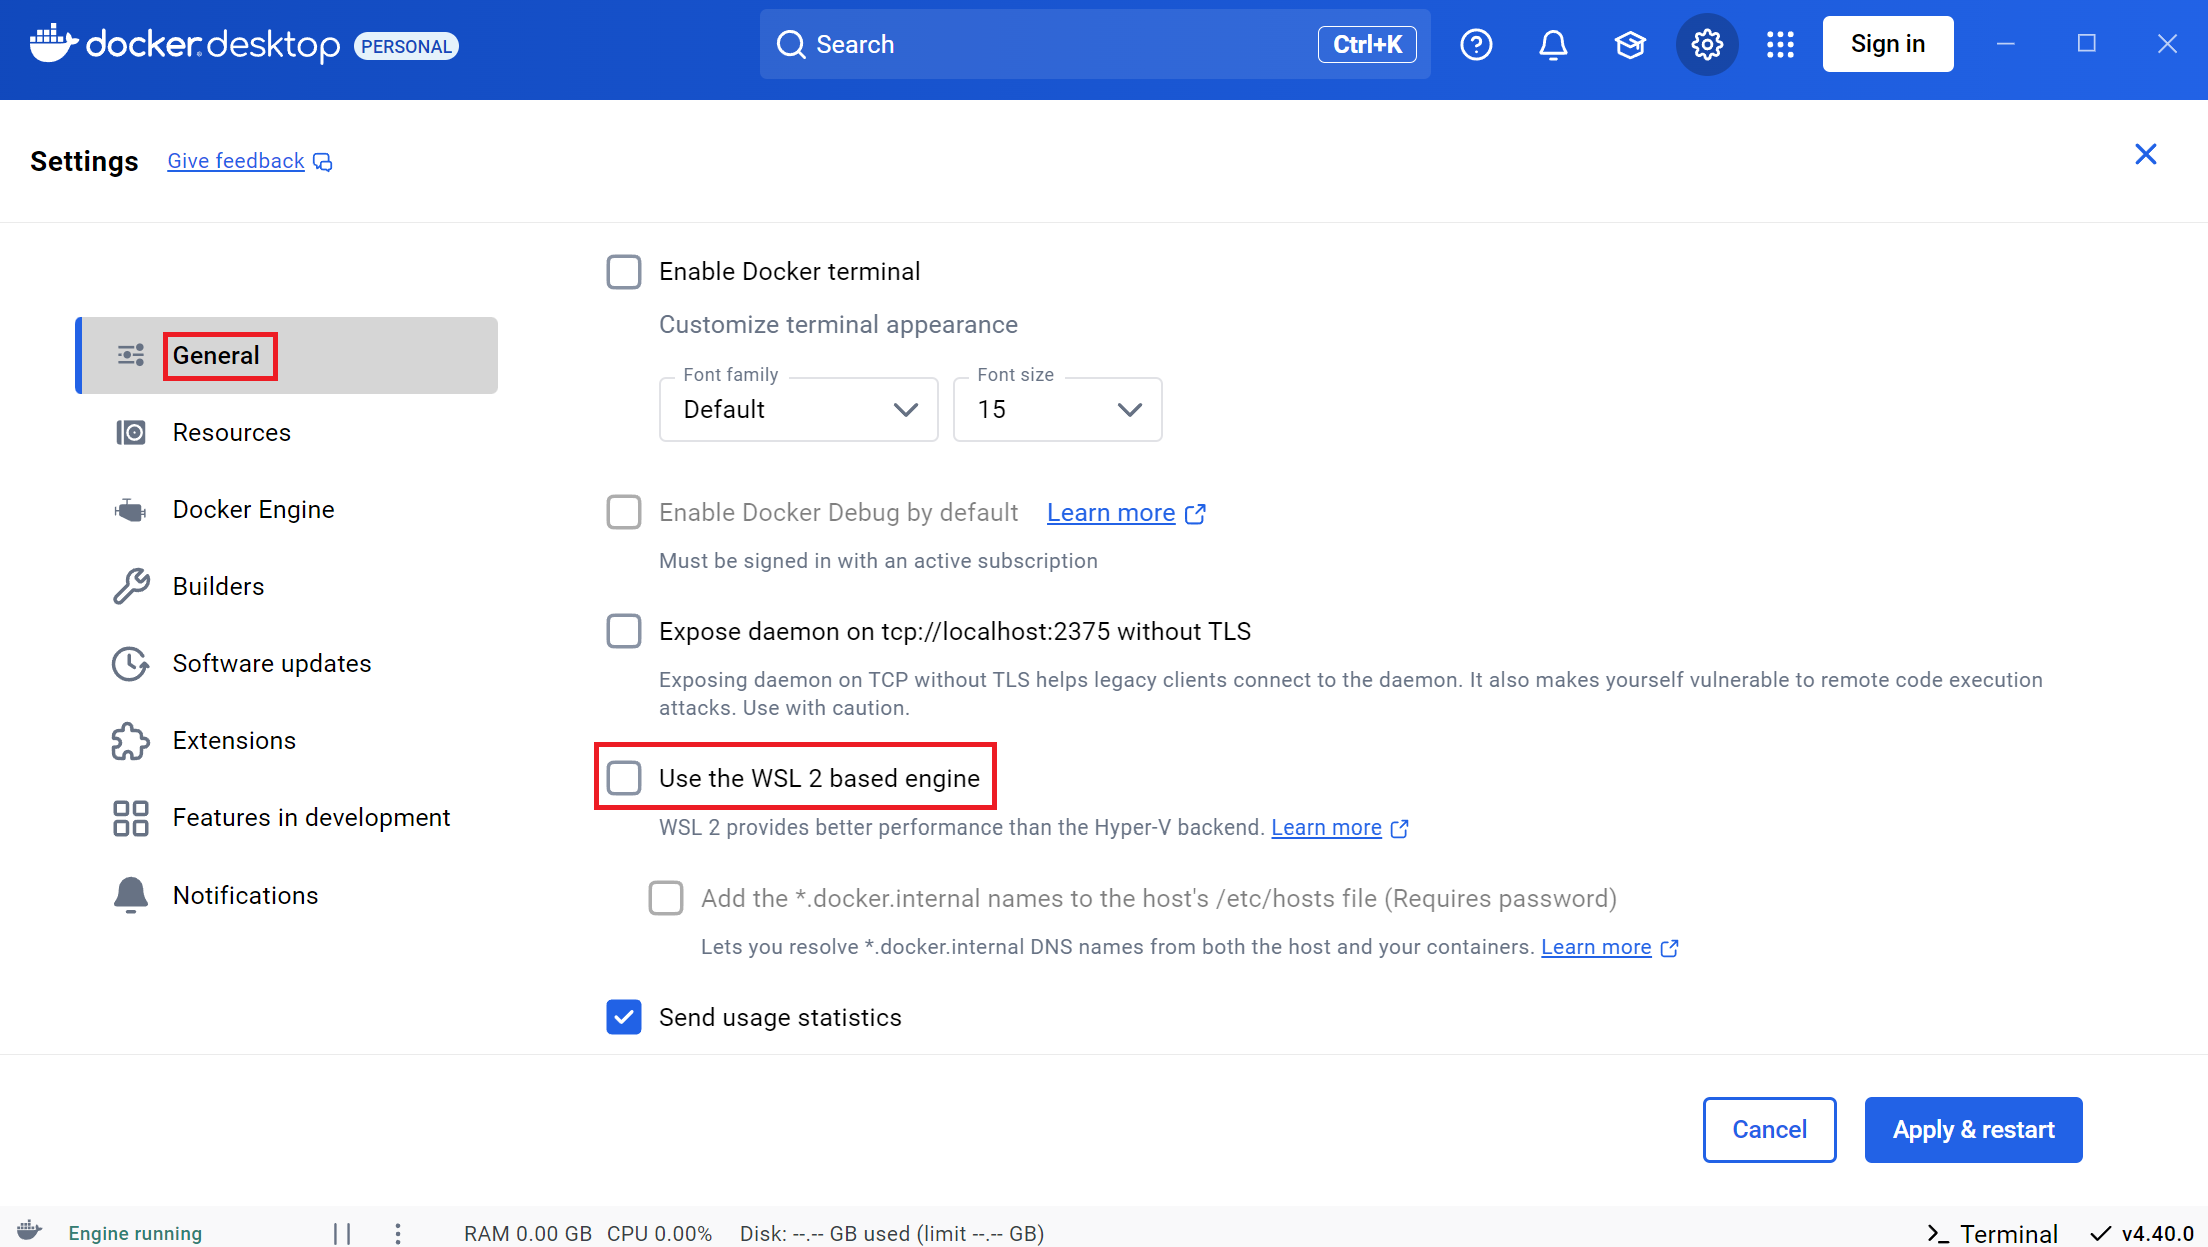
Load Docker Images
First, place the Docker image files in a folder.
Open the Command Prompt (CMD) and navigate to this directory.
cd /path/to/your/directoryLoad the Docker Images with the following commands.
docker load -i your-image-file1.tar
docker load -i your-image-file2.tar
docker load -i your-image-file3.tar
Verify that the images are loaded.
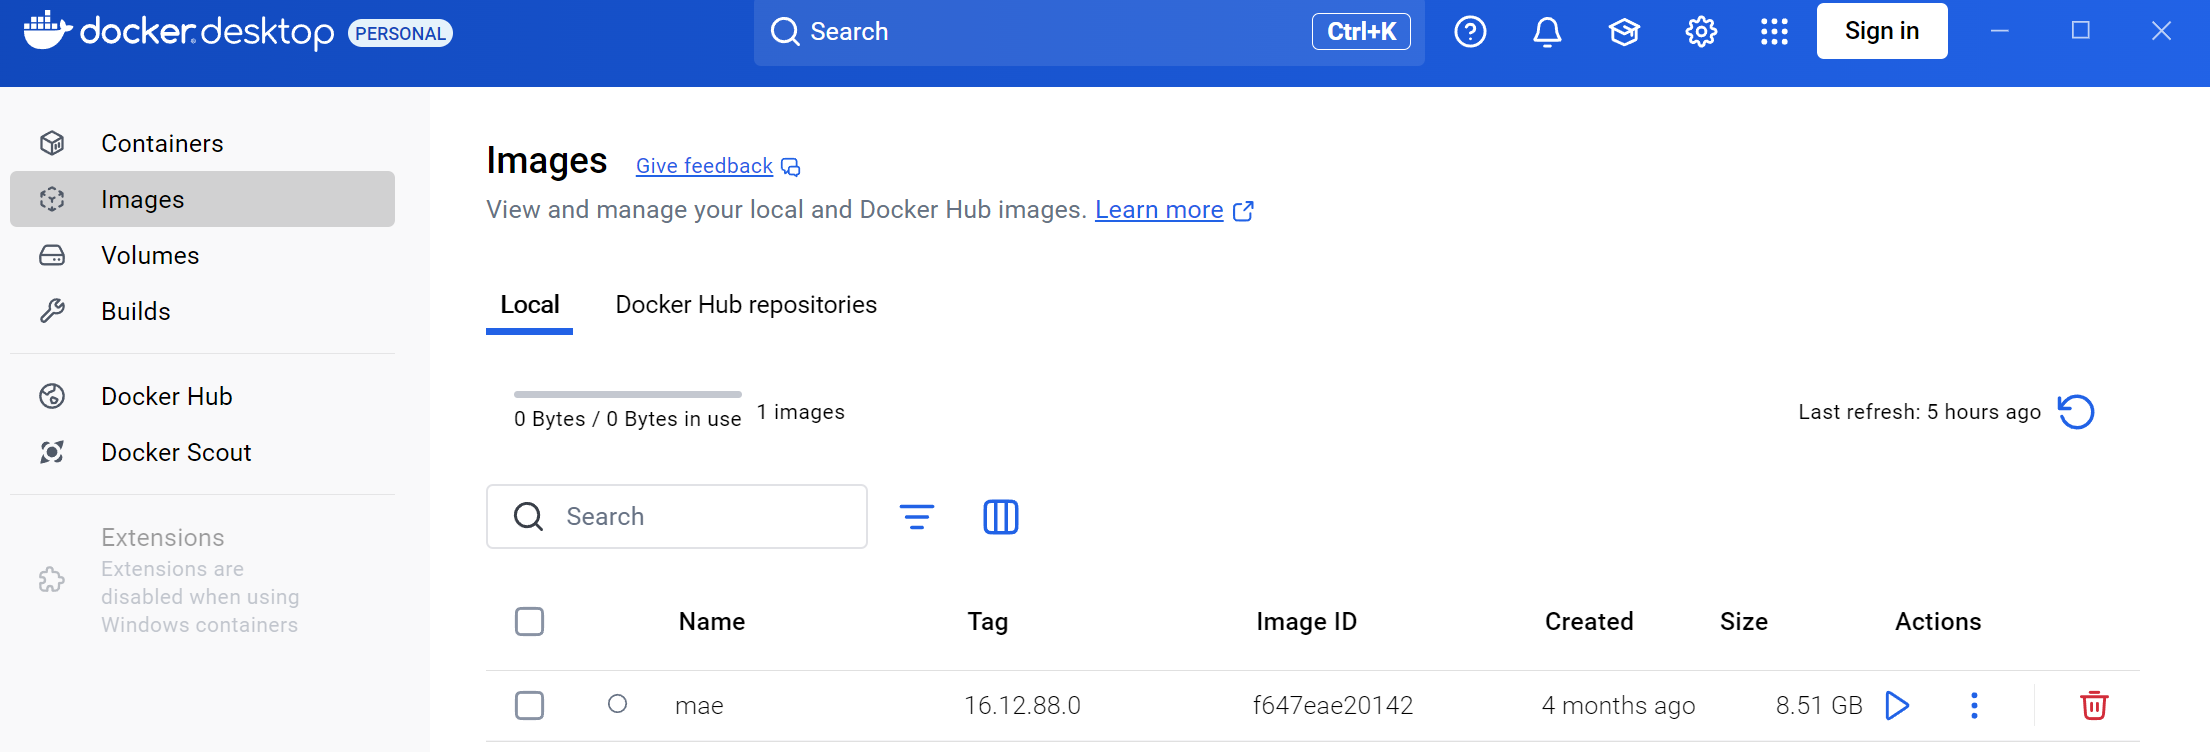
docker imagesWithin Docker Desktop, you will now see your images.
Run a Docker Container
You can run Docker containers in the terminal, but starting them directly in Docker Desktop offers an advantage. You can set your environment variables directly in a user-friendly settings panel before running your container.
Select the image you wish to run and click on the arrow to start it.
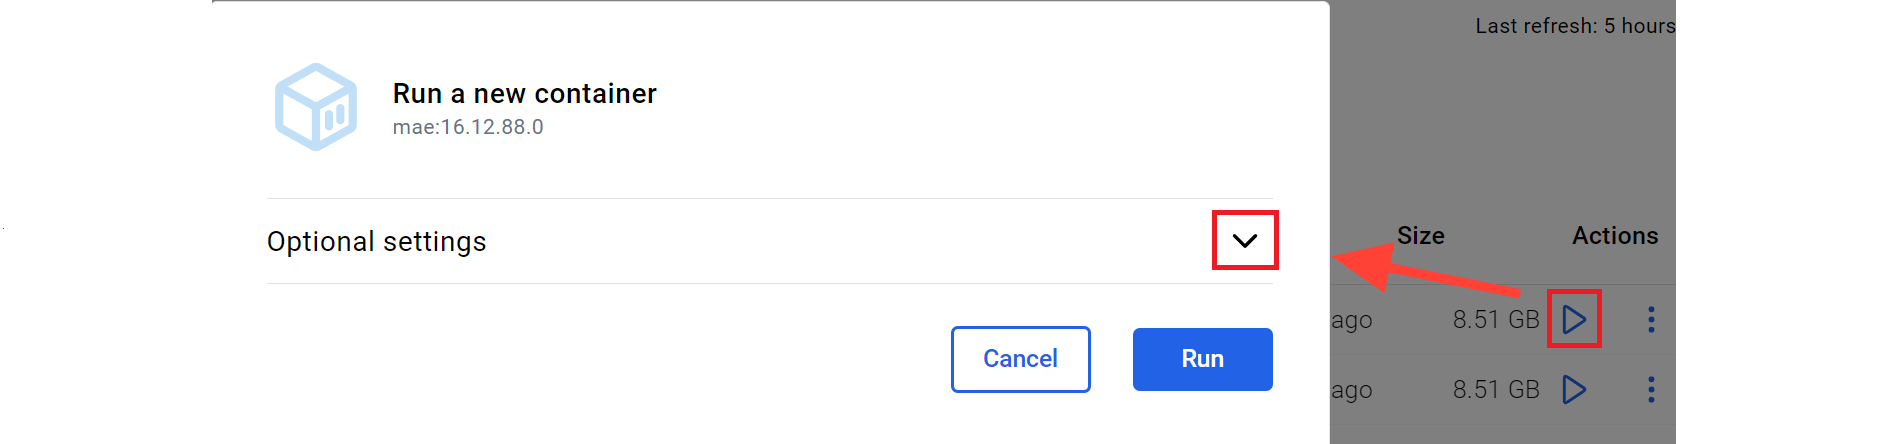
Open the optional settings to define the ports, volumes and environment variables.
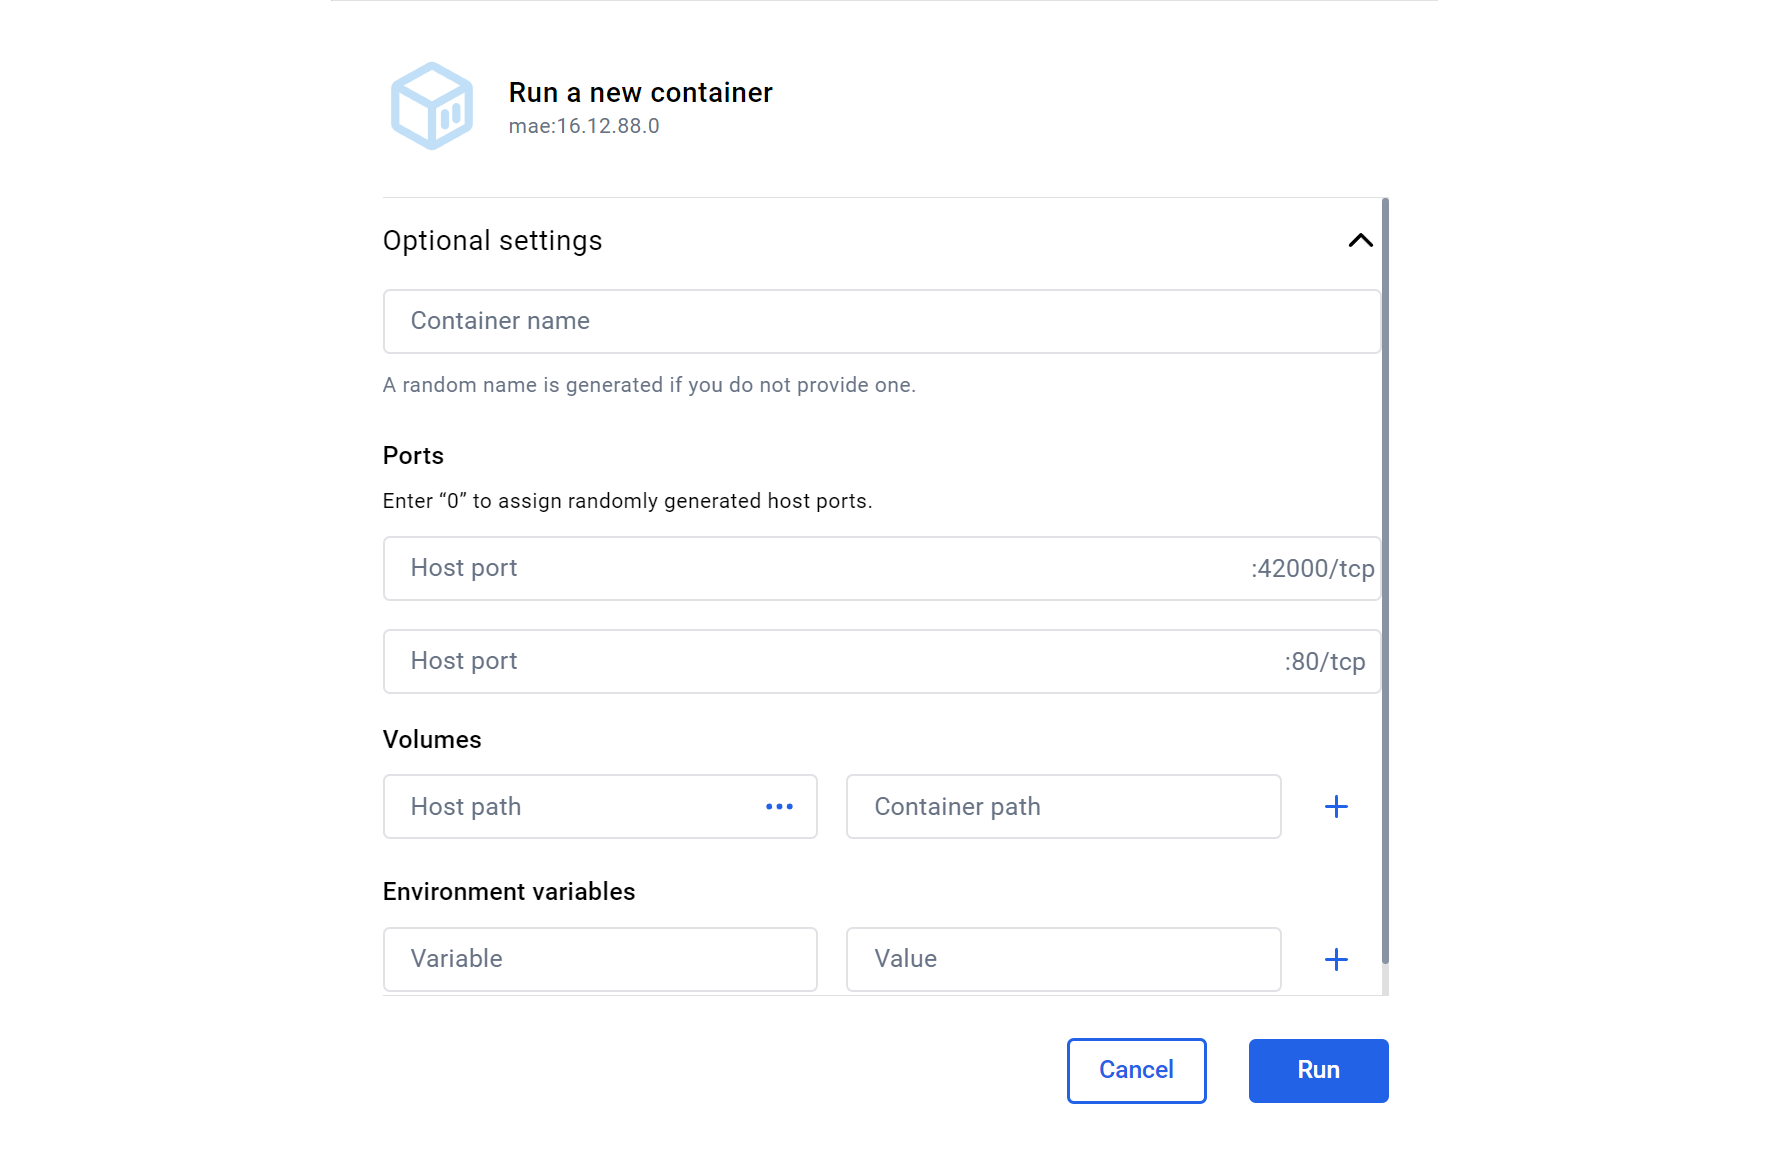
Now, assign the correct ports and add the following environmental variables.
M.APP Enterprise container
| Variable | Value |
|---|---|
| MAE_CONNECTIONSTRING | PORT=5432;HOST=<DB_Host>;USER ID=<DB_User>;PASSWORD=<DB_Password>;DATABASE=<DB_Name> |
| MAE_PROVIDERTYPE | DB_Provider |
| MAE_WAREHOUSELOCATION | \\<Warehouse_Host>\\<Warehouse_Path> |
| MAE_WAREHOUSEUSER | <Warehouse_User> |
| MAE_WAREHOUSEPASSWORD | <Warehouse_Password> |
| MAE_ADMINUSER | <Admin_User> |
| MAE_ADMINPASSWORD | <Admin_Password> |
Luciad Fusion container
| Variable | Value |
|---|---|
| MAE_AUTHSERVICEURL | https://<MAE_Host>:<Port>/api/v1/oauth2 |
| MAE_WAREHOUSELOCATION | \\<Warehouse_Host>\\<Warehouse_Path> |
| MAE_WAREHOUSEUSER | <Warehouse_User> |
| MAE_WAREHOUSEPASSWORD | <Warehouse_Password> |
| MAE_CONNECTIONSTRING | PORT=5432;HOST=<DB_Host>;USER ID=<DB_User>;PASSWORD=<DB_Password>;DATABASE=<DB_Name> |
| MAE_DBUSER | <DB_User> |
| MAE_DBPASSWORD | <DB_Password> |
| MAE_LICENSESERVER | <License_Server_Host>:<License_Server_Port> |
When the variables are set, simply click on run.
Access the Services
You can access the services running in the containers using your web browser or any HTTP client. Open your browser and navigate to:
http://<servername:port>/managementIf you want to use M.App Enterprise in a Windows Docker container but want to install Luciad Fusion seperately on a Linux machine, please have a look at this tutorial:
 Markus Holler