Getting Started
This post gives you detailed information about what is possible with the Style Editor in M.App Enterprise
M.App Enterprise Style Editor consists of 4 main components:
- Style navigator
- Rule navigator
- Editor panel
- Map preview
Style navigator
The following list describes what you can see in this screenshot:
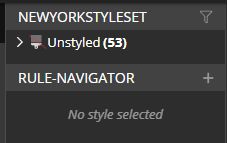
- At the top of this component, you can see the
Nameof the style set and you have the option to search through all styled vector data. - Inside the style navigator you can find all vector data that is styleable inside the style set. With going into a newly created style set every vector layer is
Unstyledand in brackets(# of all available vector data in the tenant). - If you have styles already defined (see next screenshot) you have a list of all styled vector data
- The visibility of all styled vector data can be toggled
- A styled vector layer can be deleted and thus restored to a unstyled vector layer
- If the list of styled vector data consists of 2 or more, their rendering position in the map preview is rearrangeable (with drag and drop).
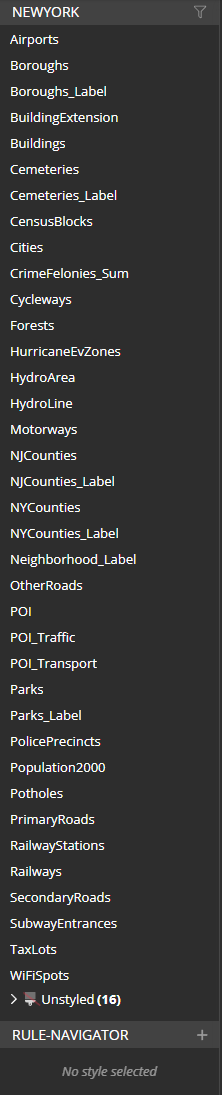
- Then there is a list of all currently unstyled vector data.
- This list can be collapsed, with a click on a vector layer, the styling process starts.
- Lastly, if there are any invalid vector data, they will be shown in the Invalid vector data list. These cannot be styled because correct portrayal is not guaranteed.
Rule navigator
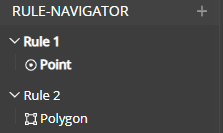
With the rule navigator, rules of the vector data, which is currently being styled, can be managed:
- With the plus icon new rules can be added.
- When hovering over a rule:
- The option to delete the rule becomes available
- The option to add symbolizers to a rule become available
- Available symbolizers include:
Point,Polygon,LineandText
- Available symbolizers include:
- Hovering over a symbolizer gives you the option to delete it
- Rules and symbolizers positions in the resulting xml are rearrangeable by drag and drop
Editor panel
As the name suggests in this section all the editing happens:
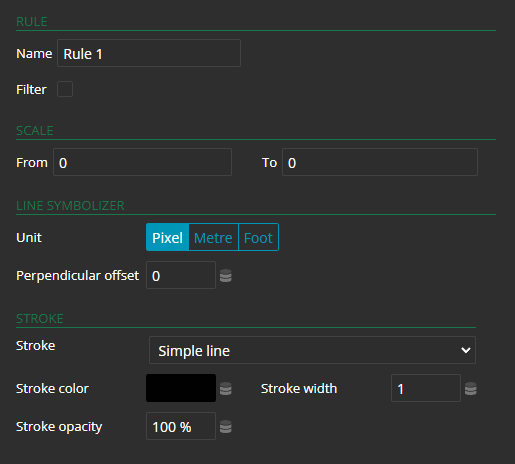
- Beginning with the rule section, all the properties of a rule can be edited including name, filter and scales.
- Toggling the filter opens a text area where a filter can be defined.
- Also comes with validation in form of green or red border.
- Scales come with validation too
Next comes the symbolizer editor section:
- Depending on the selected symbolizer various properties can be set here.
- Some of the options include:
Unit,Stroke,Fill,Graphicsand many more - Properties which are available by OGC standard can be set here.
Map preview
Inside the map preview all your editing can be reviewed immediately
- This ensures you are completely satisfied with styling your vector data and will not have to come back again to re-adjust later.
Using external graphics from database 
Since version M.App Enterprise 16.8.2 you have two possiblities to add external graphics for your Point symbolizer.
- base64 encoded SVG's / PNG's in the column of the database
- Name of the Graphic, which is stored in your
WarehouseLocation → TENANT_NAME → Images